This is a free crochet pattern for a mesh bottle bag—perfect for summer.

It was one of those days—I carried a whole wine bottle.
No bag. Just vibes.
So I made one.
This mesh bottle bag? Totally my summer go-to now.
Crochet Mesh Bottle Bag Free Pattern
The flexible, lightweight mesh fits just about anything: a tumbler, a wine bottle, even a folding umbrella.
The simple repeating stitch works up faster than you’d think.
I’ve included both a symbol chart and written instructions,
and there’s also a process video linked for reference.
It’s not a tutorial—just a look at how I made mine.
It also works surprisingly well as a wine gift bag.
.. Because handing someone a bare bottle feels a little off, doesn’t it?
🧶 INFO
Yarn: Coma Cotton 100 (18-ply)
Hook: 4.00 mm
Extras (optional): O-rings / Cord lock
🧾 Crochet Mesh Bottle Bag Free Pattern
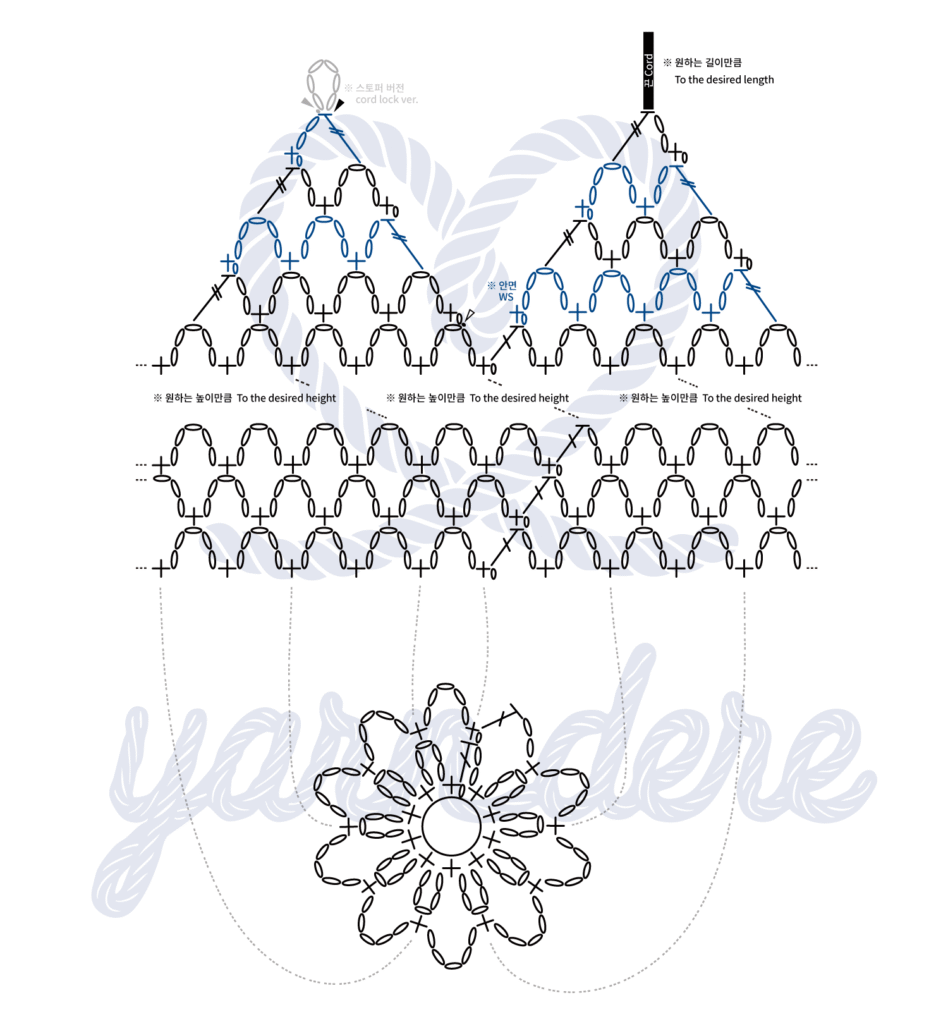
The bottle bag starts from the bottom,
then the body is worked up to the desired height.
Finally, side flaps and a cord are added.
(Pattern uses US terms)
<Bottom & Body>
Round 1: Bottom
[sc 1, ch 5] in magic ring, repeat [] 8 times,
sc 1, ch 2, and join with a dc.
Round 2 to desired height: Body
[sc, ch 5], repeat [] 8 times,
sc 1, ch 2, and join with a dc.
Work to your preferred height.
<Side Flaps>
Each flap is 4 rows tall, reducing one mesh seciton per row.
For the first flap, start on the wrong side(WS) and turn your work at the end of each row.
For the second flap, attach new yarn and start on the right side(RS).
Row 1
With WS(RS) facing: [sc 1, ch 5], repeat [] 2 times,
sc 1, ch 2, and join with a tr.
Row 2
With RS(WS) facing: [sc 1, ch 5], repeat [] 2 times,
sc 1, ch 2, and join with a tr.
Row 3
With WS(RS) facing: sc 1, ch 5,
sc 1, ch 2, and join with a tr.
Row 4
sc 1, ch 2, and join with a tr.
<Cord>
Work the cord from the top of one flap, making it as long as you like.
Use a sturdy stitch—shrimp stitch or double chain work great!
Attach the cord to the opposite flap—and you’re done.
※ Boosts finish and function—add an O-ring or cord lock.
If you’re adding a cord lock, you’ll need to make a small loop on the opposite flap. The chart shows you how!
If you don’t have any, just tie the cord directly to the flap.
Tag me and let me know!
X @yarn_dere
IG @yarn.dere
DMs open for questions or feedback.